Basic Procedure:
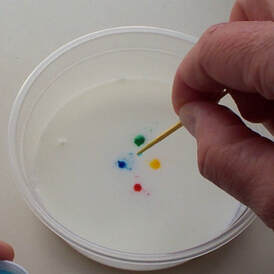
If everything works, you should see the food coloring begin moving around, leaving colored streaks and swirls on the milk surface. You may also see bursts of color suddenly appear from an otherwise plain white surface, just like colorful volcanoes or fireworks erupting. If nothing happens after several seconds, try touching another drop of soap to the milk surface, perhaps in a different spot. You can also try gently rubbing a little soap on the bottom of the bowl, or even carefully adding a drop of soap directly to the surface, but don't add too much soap. A drop or two is all you should need. Be patient- sometimes nothing may seem to be happening for a minute or more, but colors are moving around below the surface and will suddenly burst into view. Remember not to stir the milk or shake the bowl- we want the colors to move on their own, not because you move them! Additional Experiments:
What's Happening: Mother's milk is an amazing substance, which really isn't surprising considering that it contains all of the nutrients a baby needs to survive and grow. The plain white liquid you see is actually a uniform (homogenous) mixture consisting of fats or oils (composed of molecules called fatty acids), sugars, proteins, vitamins and some other chemicals, but mostly water molecules. This is called an emulsion or suspension- a mixture of liquids and solids, most of which are not truly dissolved. Normally these various components would separate (and in raw or non-homogenized milk some, notably the fats, still do), but the fatty acid and protein molecules have both hydrophilic (water-loving) and hydrophobic (water-hating) regions, which causes these long molecules to twist around and group together into more stable arrangements, making it possible for them to stay suspended in the water. The fatty acids form globules, sort of like little water balloons (or in this case, fat balloons), with their hydrophobic ends on the inside and their hydrophilic ends on the outside facing the water molecules. The proteins form similar balloon-like structures called micelles. Thus, the milk is in a complex state of equilibrium (i.e. not changing), with all the molecules not exactly "happy" to be where they are, but at least willing to stay put as long as they aren't "upset" too much. When you gently add the food color (which are dissolved in water) they are also happy to stay put in their own tiny puddles. Molecules of dish detergent, like fats and protein, also have both hydrophilic and hydrophobic regions, so adding them to the surface of the milk completely disrupts the existing state of equilibrium as the soap molecules grab and pull on the fat globules and protein micelles. Scientists say that on a molecular level, this soapy region of the milk is in a state of chaotic disarray and all of the various molecules begin to move about, dragging the food colors with them as they try to return to some equilibrium. In other words, before the soap was added the molecules in the milk were at least where they liked to be and didn't want to be disturbed. Then come along these annoying soap molecules like bullies that want to disturb everything (on a molecular level, of course). Because milk is all white, we wouldn’t normally be able to see what's happening, but as the food coloring is sort of caught in the middle we can observe all the action taking place. The fats in milk are largely responsible for the action in this experiment, so milks with more or less fat may behave differently, including milks from other mammals (see the link below). Temperature also affects many physical and chemical reactions because more energy is available at higher temperature. References and links to more information: Others versions of this activity:
Milk from other mammals: What is homogenized milk?: Learn (LOTS) more about milk chemistry:
2 Comments
Experimental Procedure:
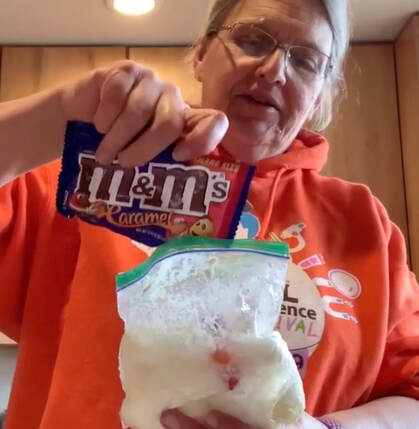
What’s Happening: The science behind this is actually rather complex, and is explained in much greater detail in our Instant Freeze Super-Cooled Water lab. Basically, when salt (or anything else) is dissolved in water it lowers the freezing point of the salt-water solution below that of pure water alone. In other words, when you put the salt and the ice together, you are making a solution that can get much colder than 32 degrees Fahrenheit (the normal freezing or melting temperature of pure water) and still remain liquid. This is called freezing point depression, and it can be very useful when you are trying to get something else really cold (in this case, the ice cream). Freezing point depression is also why the milk or cream needs to be much colder than 32°F before it will freeze; milk is mostly made of water, but with a lot of other stuff dissolved in it, and that lowers its freezing point too. As you shake the big bag, sloshing around the smaller bag inside, the super cold salt-ice-water solution in the big bag takes heat away from the cream/milk inside the smaller bag, lowering the temperature enough for it to freeze. You should also notice that this heat flowing out of the small bag melts even more of the ice in the big bag- it gets sloshier as you shake it. Of course heat from your hands does the same thing (and you might want to wear gloves as you shake the bags). It's very important that you shake the bags vigorously while the milk/cream is freezing. This breaks up the ice crystals that are forming inside the smaller bag and keeps your final ice cream smooth and creamy- just the way you probably like it. If you don't shake the bags, as these ice crystals form they will stick to each other and you'll end up with a hard frozen block of milk instead- a milk-sicle! Try it by placing another Zip-Lock bag or cup of milk in your freezer to see what happens. Variations and Related Activities: Here's another way to make ice cream, which uses the same ideas, but slightly different materials:
You can play around with many different ways to make ice cream. What if you used skim milk? 2% milk? A combination of the two? Does it take longer for them to freeze? What if you used chocolate milk? Do you prefer richer ice cream (made with pure cream), or not-so-rich ice cream (made with Half and Half)? What about ice milk (which is ice cream made with milk and no cream at all)? Which tastes the best? Another way to do this is to get two metal cans (coffee cans work well). One should be able to fit inside the other, with room for the ice and salt. It should also have a very tight-fitting lid. Put the milk/cream mix inside the small can, and put the lid on it. You might want to use duct tape to make sure that the lid stays on. Then, put the small can inside the big can. Put the ice, salt and a little liquid water inside the big can, around the small can. Put the lid on the big can, and duct tape it shut. Then, play soccer with the can for about 15-20 minutes! Untape the cans, wipe off the little can, and enjoy the ice cream! Links to more information and activities: More versions of this activity:
The science of ice cream: More homemade ice cream recipes and techniques:
Turn this activity into a real experiment:
What you'll need:
As always, be sure to ask your mom, dad or another adult to help- they'll want to taste your result. All utensils and ingredients should be clean and food-safe if you want to taste your results. Experimental Procedure:
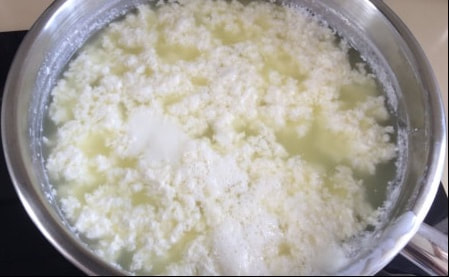
What's Happening: Mother's milk is an amazing substance, which really isn't surprising considering that it contains all of the nutrients a baby needs to survive and grow. The plain white liquid you see is actually a uniform (homogenous) mixture consisting of fats or oils (composed of molecules called fatty acids), sugars, proteins, vitamins and some other chemicals, but mostly water molecules. This is called an emulsion or suspension- a mixture of liquids and solids, most of which are not truly dissolved. Normally these various components would separate (and in raw or non-homogenized milk some, notably the fats, still do), but the protein and fat molecules have both hydrophilic (water-loving) and hydrophobic (water-hating) regions, which causes these long molecules to twist around and group together into more stable arrangements, making it possible for them to stay suspended in the water that makes up most of milk by volume. The proteins form micelles, sort of like little water balloons (or in this case, protein balloons), with their hydrophobic ends on the inside and their hydrophilic ends on the outside facing the water molecules. The fat molecules form similar but much larger balloon-like structures called globules. Our "I can't believe It IS Butter!" experiment dealt with the fat globules in milk, while in this experiment we focus instead on the protein micelles. There are dozens of different proteins in milk, but they can be grouped into two main categories: the so-called curds and whey proteins from the "Little Miss Muffet" nursery rhyme. In cow's milk the curd proteins, called caseins, outnumber whey proteins about 4 to 1 by weight. One important difference is that caseins will coagulate or form solid clumps under acidic conditions while the whey proteins will remain suspended in the liquid, and that is what is happening in this experiment. Milk solid curds are used to make cheeses, or in our case cottage cheese. Most cottage cheese you buy in the grocery store is salted, which is why the cottage cheese curds you made may have tasted a little different (you may have also tasted the lemon or lime if you didn't rinse them well). Lemons and limes have an acid called citric acid in their juice, as do other citrus fruits like oranges and grapefruit. Normally the casein micelles have negative electric charge on their outer surfaces so that they all repel each other and remain suspended in milk. When you added lemon or lime juice to your milk the citric acid neutralized these negative charges and allowed micelles to begin sticking together in larger and larger clumps, which also trap much of the fat in the milk as they form. We can also say that the milk has curdled. It was these casein curds that you caught in your strainer, while the liquid that passed through contained the remaining whey proteins. Heating the milk also strongly enhances this coagulation process. Special chemicals called enzymes can also be used to produce milk curds (described in some of the links below). In this experiment you produced a simple cottage cheese, which is essentially the first step in making any kind of cheese, though most types require many more steps (see links below for more on cheese making). Sometimes when milk spoils it can curdle (see link below) due to bacteria converting the primary sugar found in milk- lactose- into lactic acid which causes casein to coagulate just as you did with citric acid. The process of converting sugar to acid with bacteria is a type of fermentation, and this is how yogurt is made (although the fermentation is carefully controlled so the milk doesn't actually spoil). Variations and Related Activities: Try other citrus fruits in place of the lemon or lime, or different acids such as vinegar (acetic acid). Another interesting experiment uses fresh pineapple juice, which is too weak an acid to be very effective but also contains an enzyme that can produce curds by a different mechanism (see the Scientific American version below). You can also try different milks (low fat, skim, buttermilk, etc.) A fun extension of this experiment is to make your own casein glue. For our cottage cheese we used acid to make the casein micelles coagulate, which allowed us to separate them from the other whey proteins. The opposite of an acid is a base, and if we add a base like baking soda (sodium bicarbonate) to the casein curds we can reverse the process and re-suspend the sticky casein molecules in liquid to make a simple type of glue (links below). References and links to more information: Others versions of this activity:
Make better cottage cheese: Cheese making:
Why milk spoils: Milk Science Classroom Activities for older students:
Learn more about milk chemistry:
Making Casein Glue:
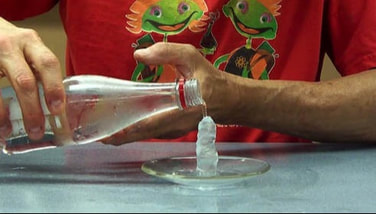 You may have seen videos of specially prepared super-cooled liquid water freezing instantly when shaken or tapped, just like ours below. But did you know that you can easily reproduce this demonstration at home? Many how-to articles on the internet tell you to simply put a bottle of water in your home freezer for some "to be determined" length of time, and while this can work, it's not very reliable. We'll show you a simple and almost fool-proof way to prepare super-cooled water and impress your friends, while also experimenting with another interesting property of water.
Experimental Procedure (note that the video above was only intended to show the basic setup and doesn't follow the experimental procedure outlined for this activity):
What's Happening: Most people believe water always freezes at exactly 32°F or 0°C. While it is true that pure water ice always begins to melt at 0°C, liquid water- even pure water- does not necessarily freeze at this temperature, and can remain a liquid at much colder temperatures (see the link below). This is called super-cooled water. The reason this can happen (not just for water, but for many substances that form crystals in their solid state) is that molecules of a liquid behave a little differently than those in either the solid state (where they are tightly locked into an orderly arrangement or crystal lattice) or gas state (where they are completely independent). All that is needed for a solid to melt is heat, which provides the energy for the crystal lattice to break apart and become liquid. On the other hand, simply cooling the molecules in a liquid does not make them form a solid. The molecules must begin to arrange themselves and form an orderly crystal lattice, and this takes a little more energy (this sort of "borrowed" energy is called the latent heat of fusion). Think of it this way: it's much easier to destroy a Lego house than it is to build one from scratch. It takes some thought and care to start building your house from the individual pieces. Forming a crystalline solid from individual liquid molecules is similar, the first few molecules must move into proper position and alignment to start building correct crystal lattice. Once this lattice begins to form, it becomes much easier for other liquid molecules to attach and continue growing the crystal lattice. The colder a liquid becomes, the more likely it is that some of the molecules will form that first crystal, but if they are not moving around much it may not happen. That's why we were very careful not to disturb the bottles until we wanted them to freeze. Tapping or shaking the bottle got the molecules moving around so that it became more likely that a few would move into the proper arrangement and form the first crystal (called a seed crystal or nucleation site), then the rest of the molecules quickly attached, and the entire bottle froze. The freezing or melting point of a substance is actually defined as the temperature at which the liquid and solid phases are in equilibrium. For pure water this means that ice is melting at exactly the same rate that liquid water is freezing so that the net amount of each stays about unchanged. That occurs at exactly 0°C (32°F) for pure water. This perfect equilibrium might seem very difficult to achieve, but actually as long as your bath contains plenty of both ice and water, and you are not adding or removing too much external heat (i.e. the cooler is well insulated), the phases will find their equilibrium and the temperature will stabilize at 0°C. That's why you should have measured 0°C (depending on the accuracy of your thermometer) in step 2. When the water in a bottle is super-cooled (below 0°C) it is not in equilibrium, since there is no ice. But once the first solid crystal forms, the amount of ice increases as more water freezes and the mixture quickly reaches equilibrium at 0°C- i.e. the temperature actually goes up as the water freezes, releasing the latent heat of fusion (see Additional Experiments below). That's why the ice that forms in the bottle is very soft and slushy, rather than frozen hard. To freeze the ice hard you must remove this extra heat somehow, perhaps by placing it back in the cooler. To super-cool a water bottle you lower it's temperature below the normal equilibrium freezing point by removing heat. Since heat only flows from hotter objects to colder ones, you need to place your bottle in contact with something colder, such as the cold air in a freezer. But most home freezers are typically set at about -10 to -15°C, so leaving the bottle in the freezer too long will lower the temperature so much that it is almost certain to form a seed crystal somewhere then freeze completely. Unless you can put a thermometer inside the bottle, you must check it often and remove it once it is supercooled but not frozen, which can be tricky. Another problem with this method is that most freezers use motors which cause vibrations, and just like when you tapped the bottle, this motion can form a seed crystal and freeze the water. You could use the ice water bath you prepared in Step 2 to cool the water, but this bath is in equilibrium at 0°C, so you can only cool your bottles to this temperature, which is not cold enough to super-cool the water. To super-cool your bottles you need an ice-water bath that is much colder than 0°C. Fortunately liquid water (or any solvent) has another very useful property- the freezing point of a solution (anything dissolved in a solvent) is always lower than the freezing point of the pure solvent. In our case this means that dissolving salt (the solute) in water (the solvent) lowers the freezing point of the salt-water solution, i.e. you must get it colder than pure water before it will freeze. This is why it is much more difficult to freeze sea water than fresh water. Note that this is not the same as super-cooled water; the salt-water is a solution, not pure water. This is also why you sprinkle salt on an icy road or sidewalk. The salt dissolves into the thin layer of liquid water that is usually present on the surface (unless the icy is very, very cold), lowering the temperature required for the ice to remain frozen. The more salt you dissolve, the lower the freezing point. It doesn't matter what kind of salt (or any other solute) you use, only how much you dissolve in the water. This is called a colligative property, meaning that it depends only on the number of particles, not their composition. Since solid ice is usually much colder than 0°C (you measured that in Step 1), adding ice to a salt water solution lowers the temperature of the solution. And since the freezing point of this salt-water-ice solution bath (the temperature where freezing and melting is in equilibrium) is lower that that of a pure water-ice bath, we can use this to super-cool our bottles of pure water. By adding enough salt it's relatively easy to prepare a bath that is -10°C or colder. Note that we used plastic water bottles in this experiment. Another interesting property of water is that it expands as it freezes, i.e. the solid phase takes up more volume than the same amount of molecules in the liquid phase. Put another way, the solid phase is less dense than the liquid phase, since density= mass/volume. That's why ice floats in liquid water (you may be surprised to learn that most substances do not exhibit this behavior!) If you were to use a glass bottle in this experiment, as the liquid water freezes there might not be enough space for the ice to expand, which would break the bottle. Variations and Related Activities: There are other interesting ways to instantly freeze super-cooled water. Very carefully unscrew the top from one of your bottles without freezing the water. Drop a small piece of ice into the water and watch as it instantly initiates freezing in the bottle. Since this piece is already solid, it serves as the seed crystal to which the liquid molecules can easily attach. You can also try slowly pouring liquid super-cooled water from the bottle onto a dish with a small piece of ice. The water will freeze as it hits the ice then continue freezing right up the pouring stream and into the bottle. For another experiment, carefully place a thermometer in the bottle of super-cooled liquid water. It should read a temperature well below 0°C. Now drop a small piece of ice into the bottle to initiate freezing and observe the temperature rise as the water freezes, until it finally reaches 0°C. As water freezes it releases heat (called the latent heat of fusion), and this heat has nowhere to go except into the rest of the water and ice in the bottle, which actually remelts some of the ice that has just frozen. This is why the bottle doesn't freeze into hard ice, but forms a very wet, slushy ice. Once the ice and water reaches equilibrium, its temperature must be at the freezing point, or 0°C.
Experiment with different types of water, which behave differently as they freeze. Some may freeze sooner (at higher temperatures), or faster, or form different shaped crystals. Note that most of these waters are actually not pure (only distilled or deionized water is pure) and contain various dissolved minerals, so their freezing point is slightly lower (just as with the salt-water bath you prepared). They are so dilute, however, that the effects of the solutes are generally negligible. Sparkling or carbonated waters are a noticeable exception. They contain dissolved carbon dioxide, so opening a bottle releases gas bubbles which may initiate freezing (they serve as nucleation sites for ice crystals to form), as well as lowering the concentration of the solute (carbon dioxide) and raising the freezing point. You can also experiment with different temperatures of super-cooled water. Generally speaking, the colder the water, the faster it will freeze once you start the process. In particular, warmer but still super-cooled water freezes slowly enough that you can easily watch individual crystals growing. Sometimes they form large snowflakes, making it appear to be snowing inside your bottle- but the snowflakes float up rather than fall down! Super-saturated (or super-cooled) sodium acetate solutions also crystalize and freeze instantly, releasing a tremendous amount of latent heat as they freeze, making them useful for "heat packs". Links to more information and activities: Freezing Point Depression: How does salt help melt ice: How cold can water be super-cooled before freezing?: Sodium acetate heat packs: More instant freezing of super-cooled water videos:
|
|
|

|

|

|

|

|